A while back I mentioned I was going to be trying out 3 different DIY art projects that I have seen floating around Pinterest lately. The first piece I made was Tape Art using a Dollar Store white canvas and some black hockey tape I had in my gear bag.
Read all about it here.
Next up.....
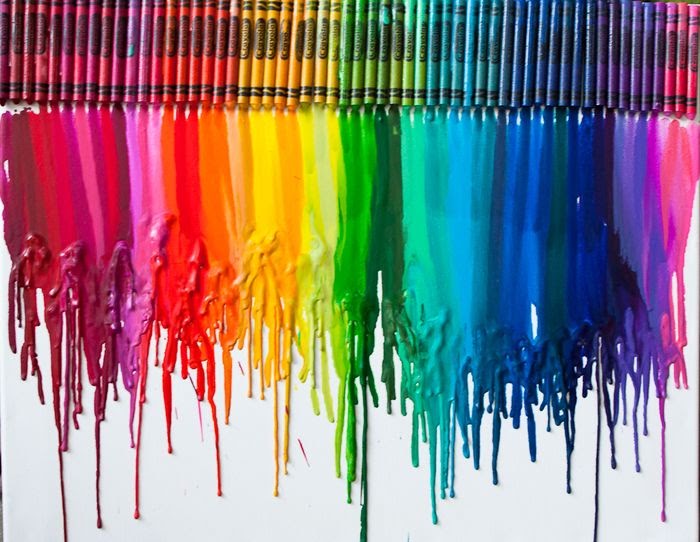
Second Piece: Abstract Art Using Melted Crayons
Crayon art is super popular right now. You may have seen this tried and true classic in your Pinterest travels......
Or possibly the classic version with a twist.....
Whilst browsing through the many bright colourful creations that are out there I found these pieces done by Jenna Brown and her hubby. Check out her blog post here.
It's a different spin on the classic by using the crayons as paint instead of taping them to the top and letting the wax melt down the canvas.
I picked up a 2 pack of canvases from Walmart so I also decided to get D in on this art project as well.
Crayola crayons produce intense bright colours when melted and are extremely workable. I have read that you must use the Crayola brand. The no name brands don't melt as easily and end up glumping together in a hot mess.
I'd already taken a crack at a melted crayon piece a couple of weeks ago and though I liked the outcome and think it's pretty, it didn't turn out exactly how I had envisioned.
First Attempt (Lisa)
Read all about it here.
Next up.....
Second Piece: Abstract Art Using Melted Crayons
Crayon art is super popular right now. You may have seen this tried and true classic in your Pinterest travels......
 |
| Unknown Source |
Or possibly the classic version with a twist.....
 |
| Flickr |
Whilst browsing through the many bright colourful creations that are out there I found these pieces done by Jenna Brown and her hubby. Check out her blog post here.
 |
| Jenna Brown |
I picked up a 2 pack of canvases from Walmart so I also decided to get D in on this art project as well.
Crayola crayons produce intense bright colours when melted and are extremely workable. I have read that you must use the Crayola brand. The no name brands don't melt as easily and end up glumping together in a hot mess.
I'd already taken a crack at a melted crayon piece a couple of weeks ago and though I liked the outcome and think it's pretty, it didn't turn out exactly how I had envisioned.
First Attempt (Lisa)

It reminds me of outer space.
To get this affect I started out with one colour (I think it was black) and held the crayon a couple of inches away from the canvas. Then I used my heat gun (we don't have a hair dryer) to melt the crayon whilst turning it slowly. The melted crayon will start to splatter on the canvas. The more you angle your heat source the more splatter you get. This can get messy so make sure you cover your work area well. Next I added some teal, then grey and finally white. All using the same method as above.
My original intention was to keep the background mostly white and to add small bursts of sporatic colour.
The downside is the more colour and crayon you add, the more the other colours on the canvas continue to melt and move around which makes it hard to keep whats already on the canvas in the same spot. The upside is throughout the whole process your work of art is constantly changing.
Second Attempt (Lisa)

I had a very set plan going into this one and just wanted to use one colour. Unfortunately I only had about a third of a crayon left in said colour so I didn't get as much colour on the canvas as I would have liked but it is definitely closer to my original desired affect.

I love how the melted crayon produces an ink like affect and that the texture of the canvas shows through in the lighter areas.
First Attempt (D)

D's method was to use the crayon as a paintbrush. He initially started painting line with the melted crayon but as I mentioned above, things change pretty quick once the colours start flowing into each other.
The other possible downside of using melted crayons to make art is it is hard to know when to stop and call the piece done.
D came to a point where he was done. The piece looked even more like flowers than it does now. Then we decided to cover the edges with melted crayon to give the canvas a more finished look. Unfortunately the crayon started to drip onto the front so we had shoot it with more heat to get rid of the runs. This in turn changed the original finished look of the piece slightly but it still looked amazing.
After this D was totally done and went off to watch a re-run of The Office. I on the other hand thought there was one corner that needed to bit more colour.... So I tried to add a bit more but as I said before the more heat you shoot at the wax already on the canvas, the more it re-melts and continues to move around and mix with the other colours. I felt like I had kinda wrecked the one corner I was trying to fix so naturally I continued to 'fix' D's art...
Long story short it turned out looking like above which isn't really how it looked when D was done with it. It is still totally awesome but not how it was supposed to be.
Moral of the story.....once you think your piece is done STOP and put down the heat gun! AND don't mess with other people's art projects. My bad.
That being said I am totally addicted to this type of art and have some ideas for more pieces I would like to try. So there will probably be a Crayon Art Part 2 post coming soon!

D's is my favorite! It has been moved from upstairs and is now hanging proudly in our bedroom. I think it looks like a watercolour flower masterpiece.