December 31, 2012

Window Seat ~ Reveal!


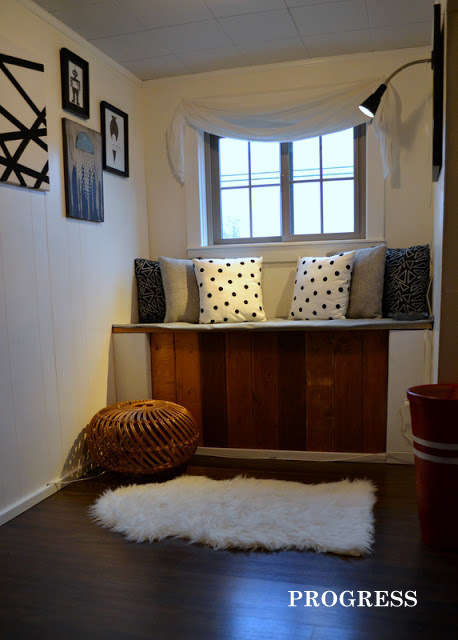
Yesterday was a beautiful winter's day. The unexpected sun was a lovely surprise and a perfect opportunity to finally take some photos of the finished window seat at the top of our stairs. There are still are few things I would like to tweak but for now I am happy with the outcome. It's cosy and relaxing and at the moment decorated for the winter season.


I picked up the red berries from my favourite garden store down the road a few days before Christmas. Their days are numbered but they still add a pretty winter colour to the neutral palette. The clay planter has been kicking around in storage for a while. I spray painted the bottom half gloss black and the top half white to achieve an ombre effect.


The cushions are all made from material collected from thrift stores. I should have ironed the fabric first but patience when working on a project isn't always my strong suit. Oh well. The black reading lamp is from Ikea and the little silver trees are from the Dollar Store. The curtain is an old Ikea sheer panel and the silver balls are left overs from a Christmas wedding I decorated last December. 


I am not overly excited about this art piece. My vision was definitely in a different direction. But true to my nature I tried to fix a mistake by adding more and this is what I ended up with. The owls are a wallpaper sample I had ordered online from a supplier in the UK (still trying to track down the company in my email). I was initially thinking of using the wallpaper to line the back of a shelving unit but you had to order a whole roll so the cost would have been too high in the end. The words are the title of one of my favourite children's books growing up. I do like how the effect on the matte resembles birch bark though. I may definitely revisit this project in the future.....we will see.

The black wooden letters are from Walmart. 


The faux sheepskin rug is from Ikea and the grey material covering the bench is also a thrift store find.


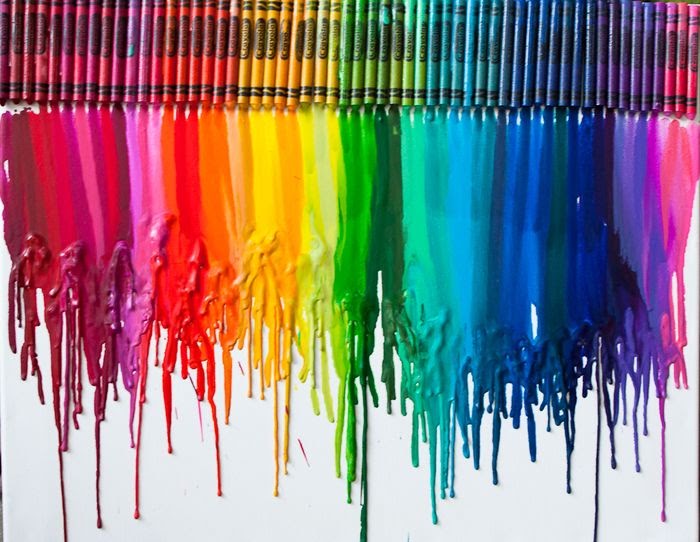
All the art on the left wall is DIY'ed. I have posted about the crayon art and the hockey tape art here and here. The other pieces will get their few minutes in the spotlight hopefully in time.


I have to say my pride and joy in this area is definitely the tree stump side table. I had snagged the stump from my Dad's wood pile last summer and left it in the basement to dry out for a few months. It was covered in thick bark and moss but I saw it's potential right away. It was love at first site. Actually I grabbed two stumps and am hoping to make another side table for the family room in the future. The second stump has a special characteristic so stay tuned.

After this stump had dried out I took a hammer and chisel to it and spent a couple of hours removing the bark as best I could. Then I spent a few more hours sanding it down. The wood was quite soft and sanded easier than I expected. Finally I sealed it with two coats of semi gloss wood sealer.


The two vintage books belonged to my Mum. The silver tea light holders are a Dollar Store find. The white ceramic bird is one of a pair I found at the thrift store a few years ago, along with the grey glass ashtray turned candy dish.


I love the colour variations and imperfections in the tree stump.


Apart from the accessories and decor, we also painted the old ugly wood panelling in this area white, caulked around the window and gave it a fresh coat of paint, repaired the ceiling tiles with dry wall filler and painted them a light grey, found the ceiling light cover in the shed, and finally added moulding around the ceiling. 

Eventually, along with the rest of the house, we will be tearing all of the wood panelling and crappy drywall out, starting from fresh with new drywall and redo this area properly. But for now with a little elbow grease and a few bucks, it's definitely a huge improvement!

Total Cost for this little update:

Reading Light - Ikea = $11.99
Faux Sheepskin Rug - Ikea = $12.99
Tree Stump - Dad's garden = Free
Cushion/Window Seat materials - Thrift stores = Less than $20 total
Cushion inserts - Reused from old cushions around the house = FREE
Window Seat Foam - The Foam Shop = $46
Clay Planter - Reused = FREE
Silver Xmas Trees - Dollar Store = $1 each ($3)
Silver Xmas Balls - Reused = FREE
White Ceramic Bird - Thrift Store = $4.99/pair
Grey Glass Ashtray - Thrift Store = $3.99
Silver Tealight Holders - Dollar Store = $1.50 each ($3)
Canvas' and Picture Frames - Dollar Store/Walmart = Less than $20 total
White Sheer Curtain - Reused = FREE
Black Wooden Letters - Walmart = $1.99 each ($10)
Paint for walls and ceiling - Had on hand from other projects around the house

Total Cost = Approx. $135.00! Not bad for a functional and attractive little nook.

And just as another reminder of what this space started out as....


December 13, 2012

Window Shopping ~ Craigslist Part 3

I haven't done a Craigslist post in a while, but that's not to say I haven't been looking. I usually browse for a few minutes in each of my preferred categories every few days.

Over the past few months there just hasn't been anything worthy or interesting up for grabs. I find that the same items are listed over and over again which makes my time spent quite boring. I have honestly said out loud to myself a couple of times, "will someone just but that _____ already!"

Even though it's the Christmas season and not really the 'right' time to be spending money on things that aren't presents for others, I did come across a few items today that caught my attention.

Wooden desk chair - $25


This isn't too bad of a price for this vintage wooden desk chair. I picture it in an old study where the walls are lined with the classic worn novels and the lucky owner is sitting behind a large desk, wearing cosy slippers and sipping a hot mug of tea.


Vintage Small Wicker Purses With Decorative Metal Clasps - $15 (Burnaby)

 I really like these little wicker purses! I'm not a purse person normally but I could definitely see myself proudly carrying these for a night out on the town. They kind of have a rockabilly feel to them. I may just buy these as a Christmas present for myself.  


Laundry or bakers table - $25


If you can look past the junk surrounding the table, you will see that it is quite fabulous. Even though we don't really have room for it at the moment, it would look great either used as a kitchen island or in the laundry room as a folding table. It would also be perfect as an office desk. Hmmm....


Antique Dresser - $75 (PNE)

The price is a little above my limit but I love love this dresser. The photo is pretty dark and you can't see the drawers but the shape, size, mirror and legs are exactly what I dream of in an antique dresser if I were ever to pick one up.


Shakespeare comedies and Tragedies - $15 (Abbotsford)

Speaking of old studies lined with novels...this Shakespeare set caught my eye. I definitely have a thing for old worn books but never pick them up when I see them as I have no idea of their real value and what I should pay for them. Anyway these would be good to use for staging or to have out on a side table for when one is in the mood for some light reading.


BANK MONEY BOXES - $45 (CHILLIWACK)

These president brass money banks were produced for promotional purposes in the States around the 50's to 70's.  I think one or both would be such a great addition to a bookshelf and/or as a conversation piece. I don't know if I would pay $45 each for them but after doing a bit of research some are selling online for quite a bit more. These two kind of remind me of Night at Museum 1 and 2. If you have seen the movies hopefully you will understand why.


I notice a theme taking shape in today's Craigslist window shopping installment...Do you? Maybe because the winter weather has me dreaming of cozying up with a good book by the fire with a hot cup of tea :)

December 6, 2012

Christmas Lights & Crows

D and I spent last Sunday afternoon putting up Christmas lights at 9808. He wanted me to document the task as it was our inaugural house lighting Xmas event.

We had quite a discussion about what type of lights we were going to use. I am pro all white lights (I think they look very classy) and D is pro multi coloured lights (he says they are the true Christmas light). I was initially going to try and stand my ground on the white lights but I am also very anti-LED bulbs. Even though they are the better option energy wise and the way of the future, I really don't like the look of them and they kind of hurt my eyes. So after much debate we decided to come to a compromise and go with the old school (energy guzzling) multi coloured Santa-Lites (yes they still sell them).  I didn't get stuck having to stare at LED's and D got his coloured bulbs.

D did most of the work whilst I did a lot of standing at the bottom of the ladder handing up plastic clips.

We bought 5 strings of 25 bulbs each which ended up covering 3 sides of the bungalow. It's a modest start but we plan on adding a few more strings each year. I would love to wrap the front porch, dormer window and possibly even Mr. Roboto, our Japanese Maple next year.

I also suggested that maybe we could switch out the lights to the all white option every other year. One year D gets what he wants and the next year I do ;) An added expense I know, but a gal can dream.


The front of the house is slowly improving but we still have a long way to go. Looking at this photo reminds me that we really must get on taking down the satellite dish and the air conditioning platform from the side of the house. Also the pile of asphalt from the driveway hanging out on the lawn isn't aesthetically pleasing either.

We were almost at the end of hanging the last strand when literally dozens of crows decided to have a crow convention above our house. I would estimate there was at least 100 of them. The experience was quite spectacular. The dark rain clouds made it quite ominous and the sound of 100 crows cawing at the same time was incredibly loud and pretty intense.


After a few minutes they calmed down and a bunch of them hung out in our tree for a while.


November 28, 2012

DIY ~ Crayon Art

A while back I mentioned  I was going to be trying out 3 different DIY art projects that I have seen floating around Pinterest lately. The first piece I made was Tape Art using a Dollar Store white canvas and some black hockey tape I had in my gear bag.

Read all about it here.

Next up.....

Second Piece: Abstract Art Using Melted Crayons

Crayon art is super popular right now. You may have seen this tried and true classic in your Pinterest travels......

Unknown Source
 
 Or possibly the classic version with a twist.....

Flickr

Whilst browsing through the many bright colourful creations that are out there I found these pieces done by Jenna Brown and her hubby. Check out her blog post here.


Jenna Brown
It's a different spin on the classic by using the crayons as paint instead of taping them to the top and letting the wax melt down the canvas.

I picked up a 2 pack of canvases from Walmart so I also decided to get D in on this art project as well.
Crayola crayons produce intense bright colours when melted and are extremely workable. I have read that you must use the Crayola brand. The no name brands don't melt as easily and end up glumping together in a hot mess.

I'd already taken a crack at a melted crayon piece a couple of weeks ago and though I liked the outcome and think it's pretty, it didn't turn out exactly how I had envisioned.


First Attempt (Lisa)


It reminds me of outer space.
To get this affect I started out with one colour (I think it was black) and held the crayon a couple of inches away from the canvas. Then I used my heat gun (we don't have a hair dryer) to melt the crayon whilst turning it slowly. The melted crayon will start to splatter on the canvas. The more you angle your heat source the more splatter you get. This can get messy so make sure you cover your work area well.  Next I added some teal, then grey and finally white. All using the same method as above.

My original intention was to keep the background mostly white and to add small bursts of sporatic colour.

The downside is the more colour and crayon you add, the more the other colours on the canvas continue to melt and move around which makes it hard to keep whats already on the canvas in the same spot. The upside is throughout the whole process your work of art is constantly changing.

Second Attempt (Lisa)


I had a very set plan going into this one and just wanted to use one colour. Unfortunately I only had about a third of a crayon left in said colour so I didn't get as much colour on the canvas as I would have liked but it is definitely closer to my original desired affect.


I love how the melted crayon produces an ink like affect and that the texture of the canvas shows through in the lighter areas.


First Attempt (D)


D's method was to use the crayon as a paintbrush. He initially started painting line with the melted crayon but as I mentioned above, things change pretty quick once the colours start flowing into each other.

The other possible downside of using melted crayons to make art is it is hard to know when to stop and call the piece done.

D came to a point where he was done. The piece looked even more like flowers than it does now. Then we decided to cover the edges with melted crayon to give the canvas a more finished look. Unfortunately the crayon started to drip onto the front so we had shoot it with more heat to get rid of the runs. This in turn changed the original finished look of the piece slightly but it still looked amazing.

After this D was totally done and went off to watch a re-run of The Office. I on the other hand thought there was one corner that needed to bit more colour.... So I tried to add a bit more but as I said before the more heat you shoot at the wax already on the canvas, the more it re-melts and continues to move around and mix with the other colours. I felt like I had kinda wrecked the one corner I was trying to fix so naturally I continued to 'fix' D's art...

Long story short it turned out looking like above which isn't really how it looked when D was done with it. It is still totally awesome but not how it was supposed to be.

Moral of the story.....once you think your piece is done STOP and put down the heat gun! AND don't mess with other people's art projects. My bad.

That being said I am totally addicted to this type of art and have some ideas for more pieces I would like to try. So there will probably be a Crayon Art Part 2 post coming soon!


D's is my favorite! It has been moved from upstairs and is now hanging proudly in our bedroom. I think it looks like a watercolour flower masterpiece.


November 26, 2012

Tea Time ~ A Craigslist Find


My sister is getting married next summer and the theme is English Tea Party Chic. I found this mismatched set of pastel coloured cups and saucers on Craigslist last week for $20 for the lot. They will be a great addition to the center pieces and would look super cute with little flowers in them, especially the blue sets.

They are also great to have in stock for other tablescapes I decide to put together in the future or a perfect excuse to throw impromptu tea parties every once in a while. The bright pastel colours scream Easter and spring time to me which is a nice change from the cold November weather outside.


November 21, 2012

Overdue Update~Saturdays In November

It's been just over a month since I have shared anything here at 9808. Gah time travels so fast!!

That is not to say nothing has been getting done on the home front though.

One of the reasons for the sound of crickets around here is I was really starting to get frustrated with our current little point and shoot camera and my photography skills (or lack there of I should say). With winter approaching and the days getting shorter our time spent at home during daylight hours has been becoming less and less. The weekends now seem to be the only time to attempt to take half decent photos. 

D works on Saturdays so the day has become my time to get up early and spend the 8 hours alone tackling small projects around the house. I get so involved with what I'm doing, it's usually by the end of the day after dark that I realize I forgot to take any photos to show you what has been going on. Sundays are then spent working on house projects together and then of course forgetting to document the progress once again. 

So I used the above as an excuse to buy a new Nikon SLR! Makes sense right? We used to have an older model Nikon so we just went with what we were already comfortable with. What it really does is motivates me to spend the time to take better quality photos of our bungalow progress and also forces me to take the time and learn to use the camera and its functions properly. 

With that all said, here are a mix of a few things that have been happening on Saturdays around here this past month. 

This adorable owl planter was picked up from the thrift store for $3.99. He was a pretty hideous yellow colour and has a small chip on his left foot. I primed him and then gave him a couple of coats of white spray paint. Now he is proudly sporting a full head of greenery on our stereo cabinet in the dining room.


Started to paint the main floor. First up was the hallway. The colour is Raindrops by CIL.


Made wooden stars out of recycled wood from the random fence panel that used to be in the front yard. More on this later.


Decorated for the fall season.


And continued working on the window seat area. There is still work to be done. Things need to be moved around, the window bench needs to be upholstered with the grey fabric, and  more art needs to be hung on the walls, but this definitely gives you an idea of the final outcome.


And a before photo.....


More updates coming soon!

October 18, 2012

Thoughts ~ TLC's 'Extreme Cheapskates'

I believe it was Tuesday night that I was flipping through the channels during  HGTV commercial breaks and stumbled upon the season premier of  TLC's 'Extreme Cheapskates' (Season 1). As with most (OK all) TLC shows these days it left me just shaking my head. But the difference with this particular show was that it was still bothering me the next day.

Now what I am saying is purely my opinion and others may definitely have different thoughts and feelings regarding the topic. Also there are always two sides of every story and folks that choose to become extreme cheapskates I'm sure all have different reasons and mindsets.

The thing that bothered me from watching parts of this show was that for some reason I felt personally offended by it.

It wasn't that Kate ate dumpster food or that she washed her clothes in the shower. It wasn't even that she never bought toilet paper or used her dishwasher as a storage unit. Some of the things she did to save money I totally agree with. Such as signing up for free samples and jogging to work. I'm all for spending as little money as possible and saving the planet at the same time!

The one thing that really bothered me was the way she chose to live in her apartment and the portrayal of that living on an extreme budget equals not having nice things.

The apartment was a complete mess and it seemed it wasn't important to Kate to have a decent kitchen table or even a proper bed. Which could be a very true statement in Kate's case.

Now hear me out....it could also quite possibly be that she isn't aware that good quality furniture is available for free if you know where to look and have a creative eye. I must say the wooden slotted chair she pulled out of the dumpster was a great score. But that was after she turned down the other chair because it was 'dirty'. A bit of soap and elbow grease could have done wonders to that piece of patio furniture.

This is where I start harping on about Craigslist and other sites that are out there with FREE sections.  I am always blown away by some things I find that others are getting rid. I have scored many great pieces of free furniture either from friends, family or online (mostly vintage) and I'm damn proud of it.  The reason they are free is usually simply the owners don't have the time, resources or energy to hold a garage sale, take items to the thrift store or have a large enough mode of transport. During this last move we put our entertainment unit up on Craigslist for free because it was large, heavy and we didn't want to break our backs moving from one place to the other.

Now that being said, Kate does live in New York and doesn't have a car but if she put her mind to it she could definitely furnish her apartment for free or close to it with quality items. To add a little decor she could use waste paper from the office to make paper mobiles to hang from the ceiling or pick some greenery from a local park to put in an empty glass jar.

Nature is actually a wonderful resource for those that don't want spend a lot of money on their home furnishings. An old tree stump can be made into a side table, dead branches can be used wall art, even stray rocks and bricks can be put to use.

In the second episode that aired right after the first we take a tour through Terence's house who lives with his wife and two teenage kids. This one bothered me even more than Kate's apartment because Terence didn't even bother to acquire furniture for his family. The house was practically bare with a single TV placed in the living room on the floor. The only other items in the room were a small table and single chair. There is absolutely no reason why this family couldn't have found or even made a TV stand using scrap lumber if need be. The kids and wife joke in the episode about how Terence won't allow them to get anymore furniture but I'm sure it's not an enjoyable environment to live in.

All said and done, I would rather see a show produced where folks' homes are furnished using only recycled and/or free items. Because I love a good design challenge show, such as HGTV's Design Star, you could have two designer's spar off to decorate two homes of families in need with an extremely minimal or zero budget!

OK rant over ;) And because a post isn't fun without pictures.....here are a few wonderful FREE items I spyed on Craigslist today.


Sofa (Tsawwassen)


Desk (Main St )


Free furniture (White Rock)


Ikea wall unit and television (Richmond) 


What are your thoughts and feelings towards Extreme Cheapskates?
Do you have any creative ways of saving money without sacrificing style and comfort?